Webelos Outdoorsman Campout August 17, 2009
Posted by jeffcummings in Uncategorized.Tags: Ash, Boy Scouts, Campfires, Campouts, Cub Scouts, Outdoors, Outings, Scout Leaders, Training, Webelos, Webelos Activity Pins, Webelos to Scout Transition
1 comment so far
Hello fellow Scouters,
Since the Webelos program allows you to camp as a den, why not  consider working on your Outdoorsman activity badge at your own den campout? When I was a den leader, I would only work on the Outdoorsman pin at an outing – I just couldn’t work on any of the requirements at a den meeting. Although just my opinion, the very name implies that you should be in the outdoors!
We worked on the Outdoorsman badge for the two dens I led at a Webelos-only campout (all the Webelos dens from the pack participated). We broke out many of the requirements into rotation stations, and spent two hours or so working on these requirements:
- Leave no Trace discussion, for #5
- Fire safety and fire starting, for #7
- Whip and fuse the end or a rope, for #10
- Set up a tent fly using knots, for #11 (#10 and 11 were combined into one station)
Then, in in the afternoon, we went on a 3 mile hike, to fulfill requirement #9. (This is just for an example – you should tailor the program requirements as you want).
Apart from the rotation stations and hikes, we worked on cooking with the boys (for #8). The boys helped pitch their tent (for #3), and had them present themselves to us and show us how they packed their bags (for #1). By the end of the weekend, not only did we have a great time outdoors, but the boys earned all of the Outdoorsman (and one or two requirement to spare).
Since you have the Scouts for the whole weekend, you can also add other activity pins. We did the Citizen flag requirements as part of the rotations, and for the evening campfire each Webelos den did a play for a Showman requirements (which also fulfilled Oudoorsman #2). We did allow plenty of free time, however, so the campout wasn’t only about Webelos requirements. Even with as much work as we did, though, all the boys had a great time at these campouts.
If you decide to hold a Webelos outdoorsman campout, I would recommend working with any other Webelos dens in your pack. This way you share the workload. And I would recommend doing this early in the program. This way if any Scouts are unable to attend, you have time before the Arrow of Light to work with the Scout on this required activity badge. And don’t be afraid to ask your parents for help – my den parents were more than willing to help and did a great job teaching the boys on some of these requirements. They just needed to be asked.
The Outdoorsman activity badge is a fun achievement to earn. And it is so much fun to work on in the outdoors. So as you plan this Scouting year’s schedule, take advantage of being able to camp as a den and consider scheduling your own Outdoorsman campout. Campouts are always fun and build great memories. And lest face it, by the time your boys are Webelos age, they often would rather do their own camping apart from the younger boys in the pack. So consider taking advantage of this and have your own campout.
Here’s to a great outdoor Webelos experience! Don’t forget to collect campfire ash!
In Scouting,
– Scouter Jeff <><
Professional Help for Webelos Leaders May 28, 2009
Posted by jeffcummings in Uncategorized.Tags: Boy Scouts, Cub Scouts, Meeting Helps, Scout Leaders, Training, Webelos, Webelos Activity Pins
add a comment
Hello fellow Scouters,
Several Webelos activity badge requirements ask you to visit a professional in their  respective field. To make my Webelos meetings more fun, I used this opportunity to invite as many professionals as I could to den meetings. Even if it wasn’t an activity badge requirement, it was a great way for the boys to meet new adults. And, let’s face it – the boys were tired of hearing me speak all the time!
One thing I’ve found is just how many people are willing to help Cub Scouts out. You would think that a professional would be too busy to give up an evening or time during their weekend. But don’t be afraid to ask – very often they love to share what they do with kids. It’s a good idea to use the summer “downtime” that we often have to send out feelers and get some professionals lined up for fall.
Here are the required professionals
– Artist/art teacher, for Artist #1. I had a distant acquaintance who is a professional surf artist, so he let each den I led come to his studio and watch him paint. An art teacher at a school or community college would be good to help with this.
– Engineer, for Engineer #1. There are a lot of engineering fields, from mechanical to civil to computer. If you don’t have a parent that is an engineer or has one at their work, call down to city hall and see if you can meet a city engineer. You can also meet with a land surveyor or architect for this requirement. So check with your parents and see if they know anyone in the construction field.
– Scientist, for Scientist #4 (part of the belt loop requirements). This one is often one of the more difficult to find. You could try calling a university or community college and see if they have a professor that is willing to help. Or you could see if you have a science museum near you. This could end up being a fun outing!
Not required, but fun to have
– Geologist – I had a geologist come once to teach the boys the Geologist activity pin. He was fun to listen to and brought a lot of samples, including a lot of fossils. The boys loved this meeting.
– Power plant engineer/worker – I had a dad in my den that worked at a near-by nuclear power plant. He showed us how electricity is generated and brought to our home, for Engineer #5. It was very interesting.
– Music teacher/musician – I had a music teacher come in and lead us through the music requirements of the Showman activity badge.
– Doctor / paramedic – I have a good friend of mine who’s a firefighter and a CPR instructor. He came in and taught much of the Readyman activity badge. He brought his CPR dummies, bandages, gauzes, etc. The boys loved this meeting!
– Woodworker – A woodworker would be a fun person to help with the Craftsman requirements. Maybe one of your parents does this as a hobby or knows someone that is a woodworker.
—
There are many opportunities to have professionals come and meet with your den – just look at the activity badge requirements and see if a professional can discuss this with the boys. Of course, you can run a fun Webelos program without bringing in a professional. As a Webelos leader, I didn’t have any of these skills, so I called in every favor I could.
Make sure you have parent surveys on hand, and know what your parents do. Maybe you have an engineer mom or dad. Maybe you have a parent that’s an accomplished musician. And let your parents know what the needs are. They might know a scientist or a geologist – you never know.
And once the meeting is done, make sure you send a thank you card. As I’ve blogged about previously, I like to have the boys in a picture with the professional, and I’d send that picture with a thank you card signed by all the boys. It’s a good follow-up for someone who’s given their time to teach the boys.
In Scouting,
– Scouter Jeff <><
Webelos to Scout Transition – Part 4 January 16, 2009
Posted by jeffcummings in Uncategorized.Tags: Boy Scouts, Campouts, Cub Scouts, Outdoors, Scout Leaders, Training, Webelos, Webelos Activity Pins, Webelos to Scout Transition
add a comment
Hello fellow Scouters,
In this installment of Webelos to Scout Transition, I want to talk 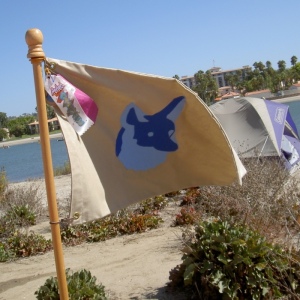 about progressive Webelos camping. One thing that I’ve done with my two Webelos dens is introduce the boys to camping with Boy Scouts gradually. Thankfully, my council and district have given opportunities for this. The goal is that by the time they cross over into Boy Scouts, they will understand the patrol method of Scouting. Along with this, hopefully the first few campouts with the troop won’t be a scary thing. Here are the steps that I’ve used.
Den Campout – As soon as we became Webelos, we went camping to a local Scout camp. There, we worked on our Outdoorsman activity pin (I won’t work on the Outdoorsman pin in a den meeting – that’s just something I can’t do). Webelos is the first time you are allowed to take your Scouts out camping away from the pack (as a reminder, a parent needs to attend a Webelos den campout). This was also the first introduction to the patrol method while at a campout, as I had the boys develop their own meal plan and duty roster (the parents ate separately). This campout was the boys first camping away from younger Scouts. It was the first time they began to establish an identity apart from the pack.
Webelos Woods – Our council offers a Webelos Woods campout in the fall, and we went the fall of our Webelos 1 year. I’m not sure how other council does this, but our Webelos Woods is basically a show put on by Boy Scouts, with the Boy Scouts providing different activity and skills areas for the Webelos to visit. The Webelos do not camp in the same sites as Boy Scouts. The only interaction is going to the stations that the Boy Scouts are running, and this was my boys first introduction to Boy Scouting. We used the patrol method of camping at this campout, and again the boys ate and cleaned up separately from their parents. The skills they learned at our first den campout were refined here.
Camporee – our district holds their Camporee in spring, and thankfully invites Webelos to attend (from what I hear, not all Camporees allow Webelos). For a Webelos to go to Camporee, they need to be sponsored by a troop, and come as their guest. We camped in the same campsite as our sponsor troop, but we were separated (we grouped our own tents together and we ate as a den, not with the troop). We were not integrated with the troop at this campout, but we got close to the troop to observe how they camped. We also got to go to a troop meeting before this campout to plan, and this was our first visit to a troop meeting.
Troop Campouts – By the fall of your Webelos 2 year, you should be spending time camping with troops and attending troop meetings. In the fall of our Webelos 2 year, we were invited to two different troop campouts. At these campouts, the Webelos are fully integrated into the troops. They are mixed in with the patrols, and their tents are mixed in with the Boy Scouts (though the Webelos shared a tent with another Webelos, not a Boy Scout). The parents were in an adult patrol. By this time, the Webelos knew enough about the patrol method of camping that they could easily work along side of the Boy Scouts in meal preparation and clean up, without interaction by Webelos den leaders or parents.
The First Boy Scout Campout Weekend – Hopefully, by the time that my boys bridge into Boy Scouts and go on their first weekend campout, the boys from my den will be ready to go and have fun. By this campout, they should have learned enough of the patrol method and basic outdoor skills to be a good contributor to their assigned patrol. And hopefully by this time it won’t be a nervous experience. It worked with my last den and I hope it will work again with my current den.
_
Every council and district is different, so you won’t be able to replicate this fully with your den. But the idea is that you find a path of gradual introduction. Webelos is all about transition from Cub Scouts to Boy Scouts, and one wants to progressively get the boys to operate apart from their parents and more towards a patrol.
I hope these help you, especially if you are a Webelos 1 or Bear den leader. If you have any methods you’ve used to help introduce Webelos to the Boy Scout outdoor experience, please feel free to leave them in the comments.
_
This is the fourth in a series I’ve written on Webelos to Scout Transition. Here are the first three entries:
Post #3 -Introducing the Patrol Method to Webelos
https://thetrainerscorner.wordpress.com/2008/11/12/webelos-to-scout-transition-part-3/
Post #2 – The Webelos Den Leader as a Recruiter for Boy Scouts
https://thetrainerscorner.wordpress.com/2008/11/07/webelos-to-scout-transition-part-2/
Post #1 – Making the Transition from a Cub Scout Den Format
https://thetrainerscorner.wordpress.com/2008/10/30/webelos-to-scout-transition/
In Scouting,
-Scouter Jeff <><
Mousetrap Catapult Plans January 2, 2009
Posted by jeffcummings in Uncategorized.Tags: Boy Scouts, Craft Helps, Cub Scouts, Den Games, Meeting Helps, Scout Leaders, Training, Webelos, Webelos Activity Pins
16 comments
Hello fellow Scouters,
There are several catapult plans on the Internet, for Webelos Engineer 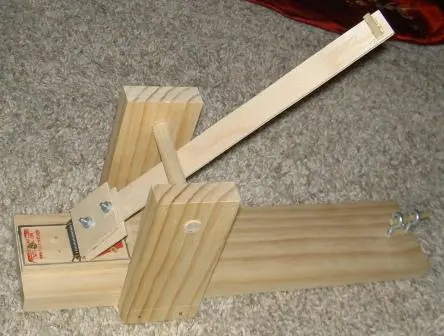 #9 requirement. Here’s one using a mousetrap that I made twice with each of my Webelos dens, that I want to share with you. This one’s not too complex to build, and having a miter saw and a drill press will make it fairly easy (but these are not necessary). This catapult takes quite a bit of prep time, and with the Webelos Engineer activity pin scheduled for February and March, there is plenty of time to work on this.
When I did this in the den, I had all the items pre-made and in bags at 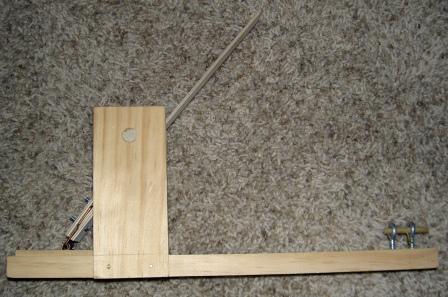 the beginning of the meeting. It took one meeting to build, and at the end of it we had a fun game of shooting pennies into cups. You can choose to pre-fab all the material or if you want you can have the boys do some of the prep work. (As a reminder, the boys cannot use power tools).
Materials:
Mousetrap with the bait-holder and hold down bar removed.
Base: 3-1/2″ x 3/4″ pine or other soft wood, 15-1/2″ long.
Sides: 2-1/2″ x 3/4″ pine x 6″ high. You will need two of these.
Cross bar: 1/2″ dowel x 5″ long. This stops the forward motion of the launch arm.
Wood connectors (to connect mousetrap to launch arm): 2 quantity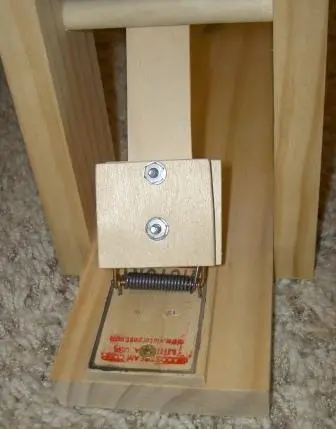 2″ x 2″ wood pieces 1/8″ thick (these need to be wide and tall enough to fully enclose the mousetrap snap bar).
Launch arms: good quality paint stirrers from a home improvement store, with a small wood piece glued near the top (used to hold item being launched).
Screws for wood connectors: 2 quantity machine screw/washer/nut, 1/2″ long, #6 size.
Wood screws (to mount mousetrap to base): 3 quantity #6 x 3/4″.
Finish nails: 4 quantity 4d finish nails to attach sides to base.
Firing pin: 1/4″ dowel approx. 2″ long (cut to fit your particular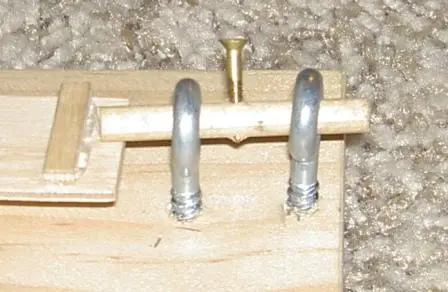 firing layout). Also a wood screw to pull the firing pin, #4 x 3/4″ (or you can use a nail for this).
Firing pin holder: 2 quantity eye bolts that will fit a 1/4″ dowel (the ones I found at the home improvement store were labeled #206).
Pre-drilling
The following items were pre-drilled before the meeting, using a drill press, to get exact 90 degree holes. Without a drill press you will need to carefully drill to get as close to perpendicular holes as possible.
1) A 1/2″ hole drilled through the side arms, centered and approx. 1″ from the top. This is for the stop bar (the 1/2″ dowel piece).
2) Two small holes drilled through the bottom of each of the side arms, for the finish nails (pre-drilling prevents the side arms from splitting when hammering the nails through them).
3) A small hole drilled through the firing pin, to hold the wood screw.
4) Three holes drilled through the mousetrap, for the wood screws that would attach it to the base.
Step By Step Instructions
Below is a link to a scan of the step by step instructions that I prepared for our district day camp last summer. This should walk you through how to put these together. (If you would like these instructions in a Word document, please e-mail me and I can send them to you).
As with all crafts, it’s important to build one well before the meeting, to make sure everything works and can be done in the allotted time. Please note that the firing pin is actually one of the most difficult steps, and can be skipped to save time.
Good luck with this! I hope these are as much fun for you as they were for my dens. Please let me know if you have any questions.
In Scouting,
-Scouter Jeff <><