Mousetrap Catapult Plans January 2, 2009
Posted by jeffcummings in Uncategorized.Tags: Boy Scouts, Craft Helps, Cub Scouts, Den Games, Meeting Helps, Scout Leaders, Training, Webelos, Webelos Activity Pins
trackback
Hello fellow Scouters,
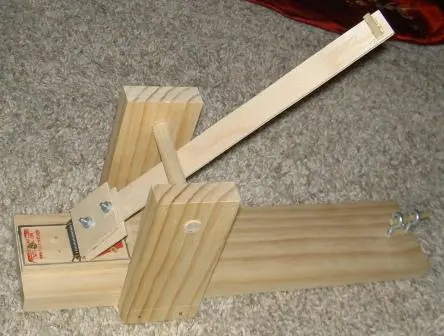
There are several catapult plans on the Internet, for Webelos Engineer  #9 requirement. Here’s one using a mousetrap that I made twice with each of my Webelos dens, that I want to share with you. This one’s not too complex to build, and having a miter saw and a drill press will make it fairly easy (but these are not necessary). This catapult takes quite a bit of prep time, and with the Webelos Engineer activity pin scheduled for February and March, there is plenty of time to work on this.
When I did this in the den, I had all the items pre-made and in bags at  the beginning of the meeting. It took one meeting to build, and at the end of it we had a fun game of shooting pennies into cups. You can choose to pre-fab all the material or if you want you can have the boys do some of the prep work. (As a reminder, the boys cannot use power tools).
Materials:
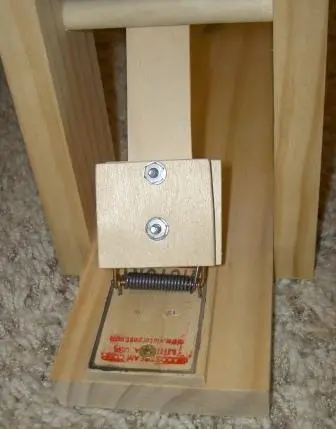
Mousetrap with the bait-holder and hold down bar removed.
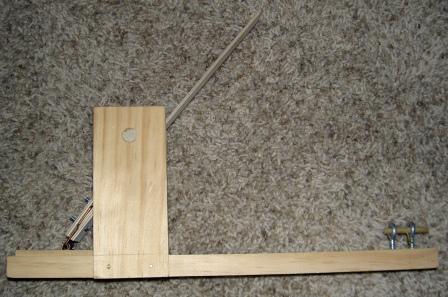
Base: 3-1/2″ x 3/4″ pine or other soft wood, 15-1/2″ long.
Sides: 2-1/2″ x 3/4″ pine x 6″ high. You will need two of these.
Cross bar: 1/2″ dowel x 5″ long. This stops the forward motion of the launch arm.
Wood connectors (to connect mousetrap to launch arm): 2 quantity 2″ x 2″ wood pieces 1/8″ thick (these need to be wide and tall enough to fully enclose the mousetrap snap bar).
Launch arms: good quality paint stirrers from a home improvement store, with a small wood piece glued near the top (used to hold item being launched).
Screws for wood connectors: 2 quantity machine screw/washer/nut, 1/2″ long, #6 size.
Wood screws (to mount mousetrap to base): 3 quantity #6 x 3/4″.
Finish nails: 4 quantity 4d finish nails to attach sides to base.
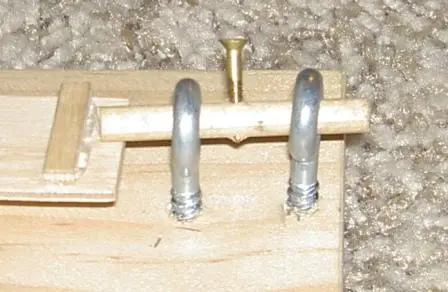
Firing pin: 1/4″ dowel approx. 2″ long (cut to fit your particular firing layout). Also a wood screw to pull the firing pin, #4 x 3/4″ (or you can use a nail for this).
Firing pin holder: 2 quantity eye bolts that will fit a 1/4″ dowel (the ones I found at the home improvement store were labeled #206).
Pre-drilling
The following items were pre-drilled before the meeting, using a drill press, to get exact 90 degree holes. Without a drill press you will need to carefully drill to get as close to perpendicular holes as possible.
1) A 1/2″ hole drilled through the side arms, centered and approx. 1″ from the top. This is for the stop bar (the 1/2″ dowel piece).
2) Two small holes drilled through the bottom of each of the side arms, for the finish nails (pre-drilling prevents the side arms from splitting when hammering the nails through them).
3) A small hole drilled through the firing pin, to hold the wood screw.
4) Three holes drilled through the mousetrap, for the wood screws that would attach it to the base.
Step By Step Instructions
Below is a link to a scan of the step by step instructions that I prepared for our district day camp last summer. This should walk you through how to put these together. (If you would like these instructions in a Word document, please e-mail me and I can send them to you).
As with all crafts, it’s important to build one well before the meeting, to make sure everything works and can be done in the allotted time. Please note that the firing pin is actually one of the most difficult steps, and can be skipped to save time.
Good luck with this! I hope these are as much fun for you as they were for my dens. Please let me know if you have any questions.
In Scouting,
-Scouter Jeff <><
Sweet, simple plan. Now how about some results? How far did it throw an egg, golf ball etc. ?
Great question! I never tried anything too heavy – I stuck with light stuff. It will launch a penny a good 7 to 8 feet.
Anything heavy will require thicker wood for the launch arm. Also, the mousetrap spring tends to pull off of the mousetrap wood base, so that would need to be strengthened. (And be warned that the mousetrap itself will go out on these after heavy usage).
The little boy in me wants to make one out of a rat trap. Imagine what that would do!
In Scouting,
– Jeff
Try using a short sling and let the arm go to vetical rather than throwing things from the end of the arm.
You’ll get a much more effective result.
I used this for a physics project but altered it a little bit. Instead of a mouse trap, I used a rat trap and didn’t use a stop bar. The goal was to launch a large marshmallow at least 12 feet in distance and 3 feet high. With this, mine went between 20 and 25 feet in distance and between 5 and 6 feet high. Thank you so much for this post. It’s sure to get an “A” for my phyics grade! 😀
Jeff,
Greetings from Grand Rapids, MI. I just wanted to add a quick “thank you” for this post and let you know that we had 10 successful Webelos 2 Engineers complete their catapults using these plans. Pre-cutting the wood and a few of the holes was really helpful. Even with this prep, the scouts were able to screw, nail and wrench the pieces together – which is a great construction experience.
You always can tell when it is a great project when the scouts leave the meeting discussing ways to improve their constructions at home.
Thanks again, from Pack 3311
hey im doing a project in engineering and was wandering if this thing would a ping pong ball at least 30 ft
Weird I am doing a S.T.E.M. project and I need to build this and have it launch a ping-pong ball at least 8 feet in the air.
That is a very good question. I have about 10 of these that I use for a penny launching game. They launch a penny around 8′. So my guess would be that they wouldn’t launch a ping pong ball 30′, but that’s just a guess. But if you redesigned this to use a rat trap, you might have a chance.
– Scouter Jeff
I don’t get how you launch the ball, though. Could you tell me?
OH i forgot… does this thing really shoot just 12 ft.? Cuz, i have to use it for a science project and its very important. 🙂
Hi Tessa,
I don’t think these would go 12′. I’ve built around two dozen of these throughout the years, and I don’t think any have gone that far (I have about 10 in a box that I made for a game, and they all shot around 7 to 8 feet). You could try adjusting the stop bar and see if you get more distance, but I still think you will come up short. If you want more distance, I would recommend altering this and using a rat trap.
As far as launching a ball, you’d need to make a way to hold the ball on the launch arm. Maybe glue a small Dixie cup to the launch bar? Or some other kind of light-weight cup that the ball would fit into but wouldn’t fit too tight.
In Scouting,
– Scouter Jeff
We need to fire a marshmallow three meters into a can. would this work for a marshmallow?
Hi! You can fire a marshmallow with these. In fact, we had a game a long time ago in our pack where we fired marshmallows into a cup. It was the first time I saw this design. I got a hold of one of the catapults from that game and reversed-engineered it to make it fire farther (by moving the stopper bar back).
I don’t know if you can get 3 meters out of it. What I would try is to build it, but don’t attached the stopper bar’s side support to the base. You can move that back and forth to see what gives you the most distance, then attached them.
Please e-mail me if you have any further questions.
Thanks!
– Scouter Jeff
thanks that was helpful i had a school project that i needed to make 1 of these for
Thanks for posting these plans! I used medium binder clips instead of screws to attach the launch arm to the mousetrap. I cut small pieces of stirrer stick to surround the trap arm.
I also attached a plastic spoon to the launch arm using a binder clip. This holds a ping pong ball quite nicely!
How would u put a golf ball on it